
NEWS from the MEWS: some suggestions and hints for your multi-media projects. Presented by the RISE video consultants who staff the MEWS.
Thursday, September 26, 2013
Adobe Premiere Pro CS6 Video Transitions!
Are you cringing because the switch between two of your clips are just so rocky? Never fear, transitions are here!!!
Here's how you use them:
1. Go into "Effects" in the project pane (bottom left hand box) and open "Video Transitions" folder.
2. Open the folder with the name of desired transition type.
3. Drag desired transition and fit it in the line between the clips requiring a transition
-OR-
Select all the clips you want to have this transition between by using shift or clicking/dragging with
the mouse and going to "sequence" in the bar at the top of the page. Select "Apply Default
Transitions to Selection".
NOTE: The transition with the yellow bordered square to the left of the title is the default transition. You can set the default transition by right clicking the desired transition and selecting "Set Selected as Default Transition".
4. To adjust the duration/speed of the transition use the gray squares on either side of the gray bar at the bottom of the timeline and drag left or right to visually enlarge the project material. Use the long gray bar to scroll until you find the transition. Click the transition and drag right to extend it/slow it down and drag left to shorten it/speed it up.
5. You can also control how much of each clip is seen at the start and end of a transition by clicking the transition and dragging the little pentagons on the bars under Square A and B that appear in the source monitor.
6. You can control whether the transition is primarily in the first or second clip by double clicking the transition and hitting +1 or +5 to move it more toward the second clip and -1 or -5 to move it more toward the first one. Use the middle button with the black and white rectangle to set it back to its default position.
Hope this helps! Remember, if you need help, our consultants will be happy to help you!

Tuesday, September 17, 2013
Adobe Premiere CS6: Features to Get Excited About!
Daunted at the thought of learning a new video editing software? Never fear!
 Premiere CS6 looks just like Final Cut Pro. In fact, the core editing commands are almost completely the same!
Here is a complete list of the Premiere key commands.
And here is a list of just a few cool features that are new in Premiere:

Here is a complete list of the Premiere key commands.
And here is a list of just a few cool features that are new in Premiere:
- You can bring projects from Final Cut or iMovie into Premiere, including transitions and layers!
- Premiere supports every footage format, and enables you to mix and match different types on your timeline!
- It even lets you export in any format!
- There is no limit to the amount of effects you can put on a clip! (in FCP there was - it's called auto-nesting)
- J-K-L TRIMMING !!!
- Your footage bins are much more organized with thumbnails of each file. You can drag your mouse over these thumbnails to scrub through each clip!
- You can even mark In & Out points on your thumbnails, allowing you to make rough cuts faster!
- The audio mixing feature allows you to have a great amount of control over your sound, in ways that FCP or iMovie never did. It shows you the peaks and valleys of your audio clips, and lets you isolate and edit different clips at once.
- Premiere's appearance is completely customizable! (from Preferences, you can change the color of any part of the interface.)
Wednesday, September 11, 2013
Welcome Back!
The RISE video consultants are back to help you with your multimedia projects. Check the schedule of staffed hours and drop by the MEWS to ask a question.
Want More than Drop-in Help?
Make an appointment with a MEWS consultant during our regularly scheduled hours. Select a Consultant Appointment slot in the Google calendar linked below:
If none of these times will meet your needs, we will be glad to make an appointment. Please send an email with some times you can meet to the email address posted in the MEWS Teaching Space.
Tuesday, July 16, 2013
Importing videos into iMovie
Before you can
start editing video clips on iMovie, they have to be imported. Importing means bringing videos into iMovie. This article gives you brief instructions on
how to import video clips into iMovie.
Connect the
camera to the Mac, with the memory card inside the camera. You will need the cable provided with your camera to do this. Set the camera to
playback or VTR mode; this is the same mode you use to view photos/videos on
the camera. Some cameras may need you to make additional selection to indicate
whether you are connecting to a computer or to some other recording device. Read your camera instructions for more information.
Open iMovie and
click on the File option. Choose Import and then Movies.

This dialog box appears.

It allows
you to choose where you want to save the footage. It is convenient because it
shows how much footage can be stored on each one of your hard drives. You can
add these clips to any existing event, or you can create a new event. You also
have the option to split days into events, so if you have recorded footage over
separate days, it will have its own event based on the date. You get to choose
how you want to keep the imported video, either Large or Full (original)
size. The last option here is the choice
of whether you want to Copy Files or Move Files. By choosing Copy Files, you retain the original files intact after copying them into
iMovie, and by choosing Move Files, you delete the original files after copying
them into iMovie. Once you
have decided on the settings, click Import.
Import
window opens up.

All the clips
recorded on the camera appear right here. You can selectively check the ones
you want to import or uncheck the ones you don’t want to import. A quick way to uncheck all the clips is to
hold down Option while clicking the check box of the clips you want to keep.
This unchecks everything else.
iMovie offers
you the option to analyze video while you import it. You can analyze the video
for Stabilization and People, using the Analyze Video option in the Import window. Stabilization feature allows iMovie to take shaky
footages and smoothen it out; People feature is for iMovie to go through
the footage and detect the presence of people. This can be useful if you want to find just the footages that have people in it, later. If you select any of
these options, just be aware that it will add significant amount of time to
your import.
Here are few
other resources you might find useful to learn more about this.
Sunday, April 21, 2013
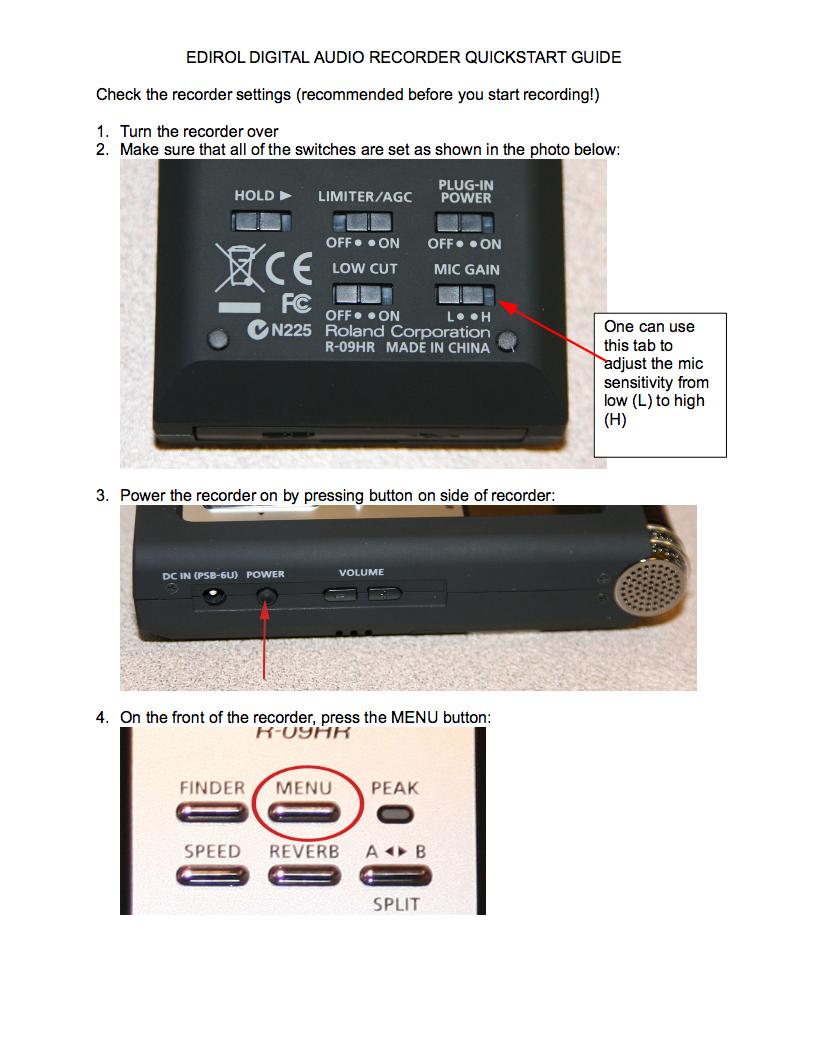
EDIROL RECORDER QUICKSTART GUIDE


Copying tracks onto your computer
1. Use the USB cable provided with the recorder to connect it to your computer. The
recorder’s USB port is located behind a door in the bottom of the recorder:

2. If the Recorder isn’t on already, power it on.
3. If you are a Mac user: A drive icon labeled No Name will appear on the desktop.
Double-click on it to open and you’ll see all of the tracks you’ve recorded.
If you are a PC user: A message bubble will appear in the Windows Task tray
(lower right hand corner of the Desktop) saying that Windows has detected new
hardware then, after a moment, that the new hardware has been installed.
Eventually a window displaying the contents of the recorder will appear.
In both cases note: Aside from your tracks which will be named similar to
R09_0001.MP3, R09_0002.MP3, etc.
4. Click and drag your tracks onto your computer Desktop or into a folder.
5. Once you’re finished copying tracks onto your computer, you’ll want to disconnect it
from your computer.
If you are a Mac user: Drag the No Name disk icon to the Trash to eject it.
If you are a PC user: Double click on the “Safely remove hardware icon” in the
Windows task tray (green arrow located toward the lower right hand corner of the
Desktop). A window will open showing “USB mass storage device” item. Click on
the Stop button. In the next window click on the OK button.
In both cases: Disconnect the USB cable from the computer and recorder.
Clearing the memory on the recorder
1. Push the menu button and use the down arrow to highlight “8 SD Card,” (please refer
to steps 4 through 6 in the “Check the recorder settings,” portion described above.

2. Use navigation arrows and control panel to select “2 Format,” and confirm “Yes,” that
you want to delete all the material in the memory.


Thursday, April 18, 2013
Saving iMovie Project to an External Hard Drive
Before saving your iMovie project, please make sure that your external hard drive is compatible. Your external hard drive must be formatted as Mac OS Extended (Journaled). iMovie doesn’t
support network-attached storage (mapped network drive or Google Drive) or
external flash memory drives.
Saving a project to a hard disk:
1. First connect the external hard disk to your computer, and the grayish icon will appear in your event library.

2. Go to Project Library

Note: Project library button is located at the top left corner
Select the project you have created. If you need to move the project, hold down the Command key as you drag the project to the icon of your external hard drive, and then choose “Move project” or “Move project and Events. If you need to copy the project, simply drag your project to the icon of the hard disk (in the Event Library) to your external hard drive.

“Copy Project/ or Move project” means that project in its new location rather than physically copying project’s
video and other media (such as photos) onto the other disk. This will NOT allow you to work on your project from another Mac. It creates only a copy of the project file, no clips, images, etc. that are part of your project. This is not usually useful for protecting/backing up your work.
“Copy Projects and Events/ or Move Projects and Events” means that the source video and other media
you added to the project are copied to the new
location/ hard drive. If you select Move, instead of Copy, these files will be deleted from their original location. Moving or Copying Project and Events will allow you to work on your project from another Mac.
Note: Move vs. Copy?
Copying the file will not delete your projects from original location while moving will delete your projects from original location.
Make sure you select Move Projects and Events!
Please remember that computers at MEWS are frozen, which means that they automatically delete any saved files on the computer!
Click here for more in depth explanation :)
What is aspect ratio and how to set the aspect ratio in your iMovie.
Aspect ratio of an image is the image’s width to height
ratio. In order to avoid black bars in the sides of your iMovie video, you must
use the correct aspect ratio for your project. Most videos today have either 4
: 3 or the 6 : 9 (also called widscreen)
aspect ratio. It’s good if you know what
aspect ratio the video you are importing to iMovie has.
You can learn more about aspect ratios here.
How to have the right aspect ratio for your iMovie project?
The only time when you will get to determine your iMovie
video’s aspect ratio is when you first create your project.
To create a new project, go to File -> New Project.

A new window will pop up asking you to name the project. Be sure to give your project a unique, appropriate name.

Under the Aspect Ratio section, you can choose between 4 : 3
and Widescreen aspect ratios.

That's it! Now you can enjoy creating videos without any disproportionate dimensions. =)
Subscribe to:
Posts (Atom)