Showing posts with label audio recording. Show all posts

Wednesday, February 19, 2014

Exporting Files from Audacity

To export the file you are currently working on in Audacity, go to File and then Export.


Give a filename and location and select the format that you want to save the file in. 


For more advanced export options, click on 'Options' button next to the Format drop down menu.


]

For more information about file formats  and exporting options,  see the Audacity Manual section on exporting audio. To learn more about using Audacity, try some of the Audacity tutorials.

Recording Audio with Audacity

In order to record your voice on Audacity, check that your microphone/input systems are properly connected, especially if you are not using your computer’s built in microphone. We don't recommend using the inbuilt microphone because the sound quality is likely to be poor. 

Make sure you have the right settings in Audacity.
You can select the input system you are using for your recording session on the drop down menu.  


Now you are ready to record. 
Click on the Red record button and start recording.


You will immediately see a track being built. 


To pause your recording, click on the blue pause button. 
When you are done, click on the yellow stop button. 


You can now edit and export your recording.

For more information on Recording in Audacity:

A Beginner’s Guide To Producing Home Music Recordings With Audacity


To learn more about using Audacity, try some of the Audacity tutorials.

Tuesday, November 5, 2013

Why Isn’t My Computer Using My External Microphone!?


Whether you are using an external microphone for communicating through programs like Skype, G-Chat, or a video game, or you are wanting to record some audio into a program like Audacity or GarageBand, you probably want your external microphone and computer to get along. If they don’t, here are some basic troubleshooting techniques that might keep you sane.

1)    Make sure your computer has recognized your microphone

Mac                                                                
a)     Click on “system preference” located in the apple menu at the top-left corner of your screen

b)    Click on “sound” in the “hardware” menu
c)     Make sure that your external microphone appears in the “Input” list


d)    Make sure that your external microphone is selected in that list.

***If you do not see your external microphone, try unplugging and re-connecting all of the wires associated with your microphone****


            PC
a) Open the start menu, Select Devices and Printers


b) If you do not see your microphone in the Devices Menu or in the Unspecified Menu, try unplugging your external microphone from the computer, making sure that wire is plugged firmly into the external microphone and re-plugging it

2)    Make sure that the program you are using is accommodating your external microphone

This is done by going to the preferences for your specific program (this varies from program to program) and making sure that your external microphone is selected as the audio output option.

For example, in Skype: Open the Audio Settings of Skype by going to the Skype preferences menu under tools > options > audio settings


Most external microphones can be plugged directly into your USB port or headphone. Some require interface boxes (this is more common among higher-end studio recording microphones. If this were the case, your microphone would not plug anywhere into your computer. You would probably know if this were the case).

These steps work most of the time. If they do not, you can also try re-booting your computer or reflecting on whether your external microphone is functional and whether your computer is capable of recognizing external microphones.

As always, don't hesitate to come into the MEWS consultant help hours if you are still having difficulties and we can aid you in person!


Sunday, April 21, 2013

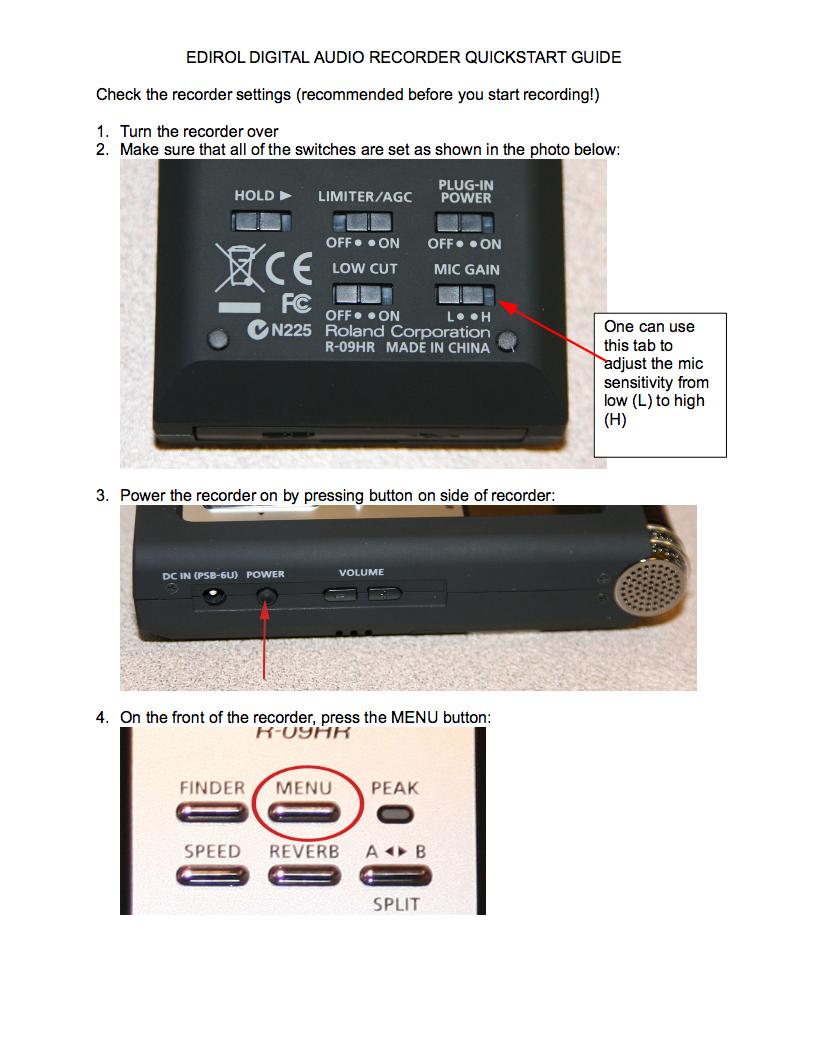
EDIROL RECORDER QUICKSTART GUIDE

Copying tracks onto your computer
1. Use the USB cable provided with the recorder to connect it to your computer. The
recorder’s USB port is located behind a door in the bottom of the recorder:

2. If the Recorder isn’t on already, power it on.
3. If you are a Mac user: A drive icon labeled No Name will appear on the desktop.
Double-click on it to open and you’ll see all of the tracks you’ve recorded.
If you are a PC user: A message bubble will appear in the Windows Task tray
(lower right hand corner of the Desktop) saying that Windows has detected new
hardware then, after a moment, that the new hardware has been installed.
Eventually a window displaying the contents of the recorder will appear.
In both cases note: Aside from your tracks which will be named similar to
R09_0001.MP3, R09_0002.MP3, etc.
4. Click and drag your tracks onto your computer Desktop or into a folder.
5. Once you’re finished copying tracks onto your computer, you’ll want to disconnect it
from your computer.
If you are a Mac user: Drag the No Name disk icon to the Trash to eject it.
If you are a PC user: Double click on the “Safely remove hardware icon” in the
Windows task tray (green arrow located toward the lower right hand corner of the
Desktop). A window will open showing “USB mass storage device” item. Click on
the Stop button. In the next window click on the OK button.
In both cases: Disconnect the USB cable from the computer and recorder.
Clearing the memory on the recorder
1. Push the menu button and use the down arrow to highlight “8 SD Card,” (please refer
to steps 4 through 6 in the “Check the recorder settings,” portion described above.


2. Use navigation arrows and control panel to select “2 Format,” and confirm “Yes,” that
you want to delete all the material in the memory.


Wednesday, April 17, 2013

Soundflower and Audacity for Recording Audio


Using Soundflower and Audacity to Record Audio from Computer 


Soundflower is an OS X extension that allows applications to move/pass audio to other applications. (Warning, Apple does NOT recommend this app for Mac OS X 10.8)


Once Soundflower is installed, you need to change settings in the preferences of both Audacity and the Mac system as follows: 

Audacity:
Open Audacity, go into Preferences>Devices
Audio I/O:
            Host: Core Audio
            Playback: Soundflower (2ch)
            Recording: Soundflower (2ch), Channels: 2(stereo)
MAC:
Apple System Preferences > Sound
Set Input: Soundflower (2ch); Output: Soundflower (2ch)

Start playing something (try a Youtube, for example), hit record in Audacity.
When finished recording, go back into Apple System Prefences > Sound and Audacity Preferences > Audio I/O to reverse settings.