Sunday, April 21, 2013

EDIROL RECORDER QUICKSTART GUIDE

Copying tracks onto your computer
1. Use the USB cable provided with the recorder to connect it to your computer. The
recorder’s USB port is located behind a door in the bottom of the recorder:

2. If the Recorder isn’t on already, power it on.
3. If you are a Mac user: A drive icon labeled No Name will appear on the desktop.
Double-click on it to open and you’ll see all of the tracks you’ve recorded.
If you are a PC user: A message bubble will appear in the Windows Task tray
(lower right hand corner of the Desktop) saying that Windows has detected new
hardware then, after a moment, that the new hardware has been installed.
Eventually a window displaying the contents of the recorder will appear.
In both cases note: Aside from your tracks which will be named similar to
R09_0001.MP3, R09_0002.MP3, etc.
4. Click and drag your tracks onto your computer Desktop or into a folder.
5. Once you’re finished copying tracks onto your computer, you’ll want to disconnect it
from your computer.
If you are a Mac user: Drag the No Name disk icon to the Trash to eject it.
If you are a PC user: Double click on the “Safely remove hardware icon” in the
Windows task tray (green arrow located toward the lower right hand corner of the
Desktop). A window will open showing “USB mass storage device” item. Click on
the Stop button. In the next window click on the OK button.
In both cases: Disconnect the USB cable from the computer and recorder.
Clearing the memory on the recorder
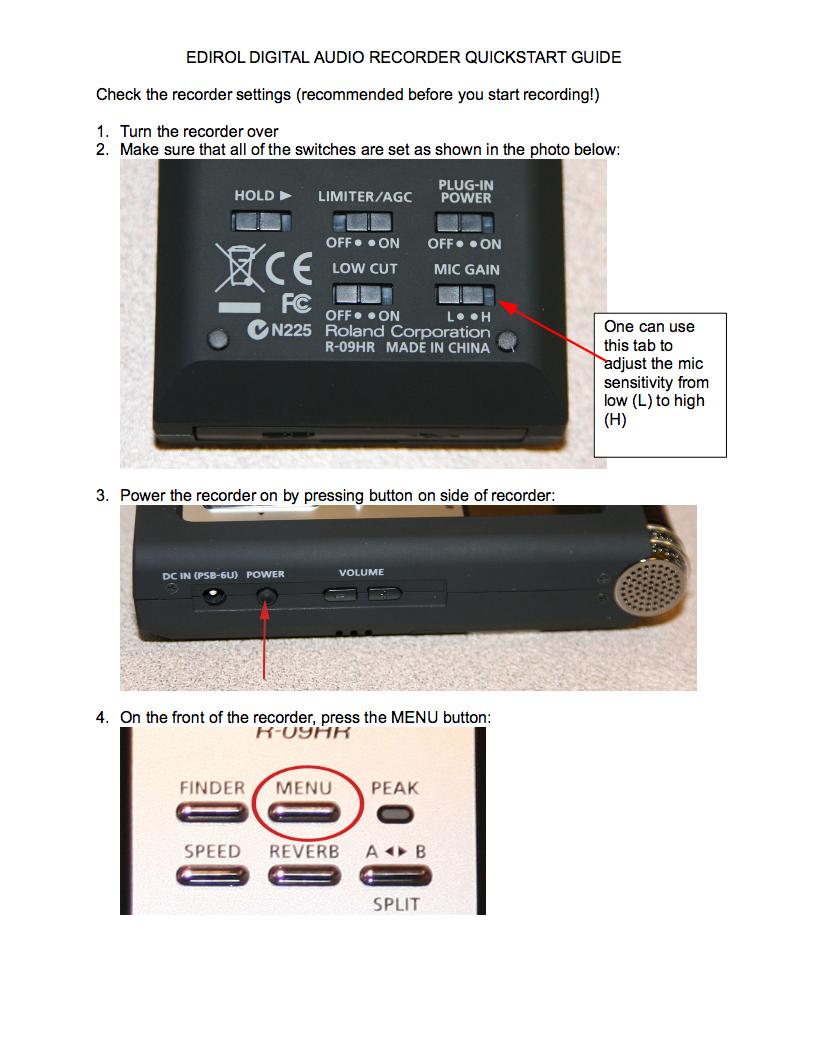
1. Push the menu button and use the down arrow to highlight “8 SD Card,” (please refer
to steps 4 through 6 in the “Check the recorder settings,” portion described above.


2. Use navigation arrows and control panel to select “2 Format,” and confirm “Yes,” that
you want to delete all the material in the memory.



Thursday, April 18, 2013

Saving iMovie Project to an External Hard Drive

Before saving your iMovie project, please make sure that your external hard drive is compatible. Your external hard drive must be formatted as Mac OS Extended (Journaled). iMovie doesn’t support network-attached storage (mapped network drive or Google Drive) or external flash memory drives.


Saving a project to a hard disk:


1. First connect the external hard disk to your computer, and the grayish icon will appear in your event library.


2. Go to Project Library

Image of the Project Library button.
Note: Project library button is located at the top left corner 

Select the project you have created. If you need to move the project, hold down the Command key as you drag the project to the icon of your external hard drive, and then choose “Move project” or “Move project and Events. If you need to copy the project, simply drag your project to the icon of the hard disk (in the Event Library) to your external hard drive.


Copy Project/ or Move project” means that project in its new location rather than physically copying project’s video and other media (such as photos) onto the other disk. This will NOT allow you to work on your project from another Mac. It creates only a copy of the project file, no clips, images, etc. that are part of your project. This is not usually useful for protecting/backing up your work. 

“Copy Projects and Events/ or Move Projects and Events” means that the source video and other media you added to the project are copied to the new location/ hard drive. If you select Move, instead of Copy, these files will be deleted from their original location. Moving or Copying Project and Events will allow you to work on your project from another Mac. 

Note: Move vs. Copy?
Copying the file will not delete your projects from original location while moving will delete your projects from original location.

Make sure you select Move Projects and Events!

Please remember that computers at MEWS are frozen, which means that they automatically delete any saved files on the computer!


Click here for more in depth explanation :)

What is aspect ratio and how to set the aspect ratio in your iMovie.


Aspect ratio of an image is the image’s width to height ratio. In order to avoid black bars in the sides of your iMovie video, you must use the correct aspect ratio for your project. Most videos today have either 4 : 3 or the  6 : 9 (also called widscreen) aspect ratio.  It’s good if you know what aspect ratio the video you are importing to iMovie has.

You can learn more about aspect ratios here.


How to have the right aspect ratio for your iMovie project? 


The only time when you will get to determine your iMovie video’s aspect ratio is when you first create your project.

To create a new project, go to File -> New Project.


A new window will pop up asking you to name the project. Be sure to give your project a unique, appropriate name.


Under the Aspect Ratio section, you can choose between 4 : 3 and Widescreen aspect ratios.


That's it! Now you can enjoy creating videos without any disproportionate dimensions. =)

Wednesday, April 17, 2013

How To Split a Clip and Detach its audio


- Make sure the part of the video you want the audio to be detached from is a single clip.  Partial audio cannot be detached from a clip.


-  To split smaller clips out of a bigger clip, you can select the portion of the clip you want to split, right-click on it and select ‘Split Clip’.


- You should now see the clear gap between the two clips.


- To detach the audio from a clip, just right  click on the clip and choose ‘Detach Audio’.


- You should now see a purple banner under your clip. That’s the detached audio.


- You can now move the audio within your project without changing the video sequence.


Or you can delete the audio altogether without deleting the video. The clips will have no sound over it. Just right click on the audio clip and select ‘delete selection’.


Enjoy your movie!


Soundflower and Audacity for Recording Audio


Using Soundflower and Audacity to Record Audio from Computer 


Soundflower is an OS X extension that allows applications to move/pass audio to other applications. (Warning, Apple does NOT recommend this app for Mac OS X 10.8)


Once Soundflower is installed, you need to change settings in the preferences of both Audacity and the Mac system as follows: 

Audacity:
Open Audacity, go into Preferences>Devices
Audio I/O:
            Host: Core Audio
            Playback: Soundflower (2ch)
            Recording: Soundflower (2ch), Channels: 2(stereo)
MAC:
Apple System Preferences > Sound
Set Input: Soundflower (2ch); Output: Soundflower (2ch)

Start playing something (try a Youtube, for example), hit record in Audacity.
When finished recording, go back into Apple System Prefences > Sound and Audacity Preferences > Audio I/O to reverse settings.